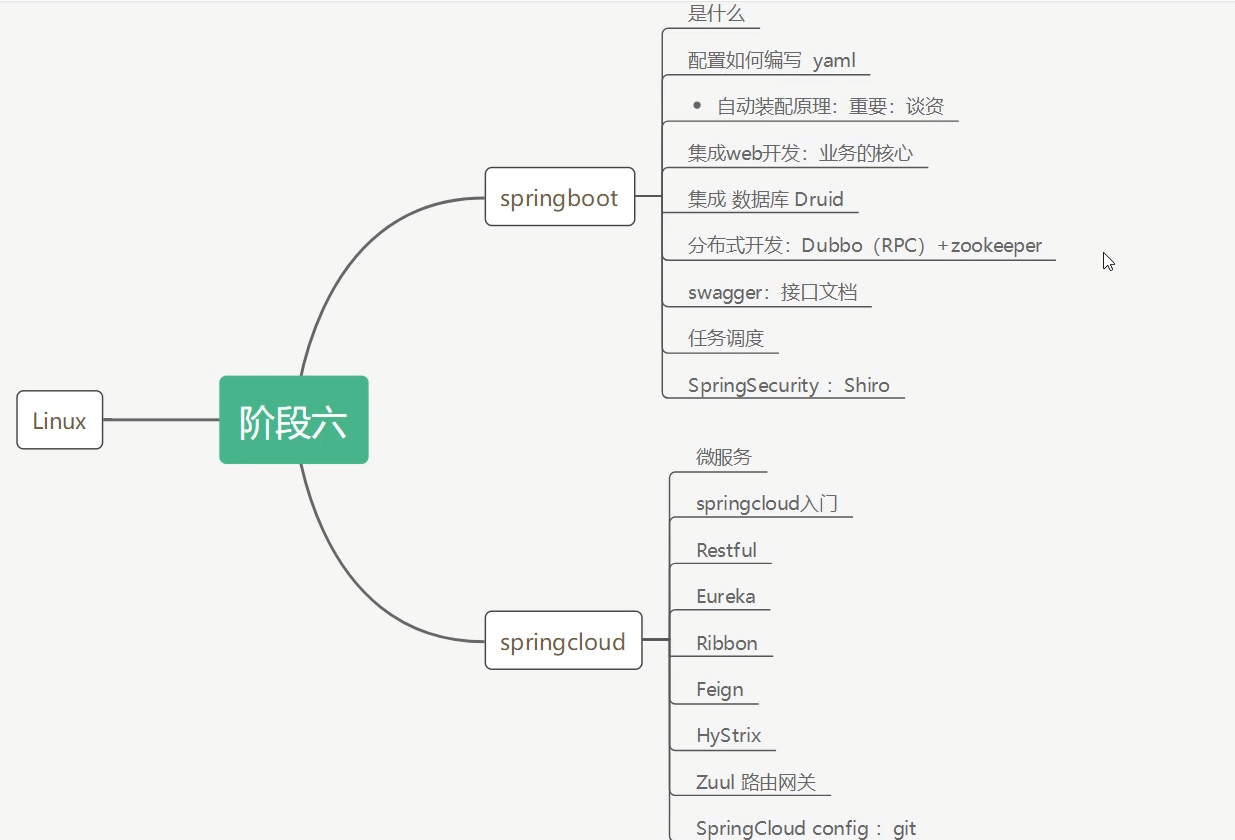
Springboot 学习路线
springboot简介 是什么 Spring是一个开源框架,2003 年兴起的一个轻量级的Java 开发框架 。
Spring是为了解决企业级应用开发的复杂性而创建的,简化开发。
啰嗦一点就是
Spring Boot 基于 Spring 开发,Spirng Boot 本身并不提供 Spring 框架的核心特性以及扩展功能,只是用于快速、敏捷地开发新一代基于 Spring 框架的应用程序。也就是说,它并不是用来替代 Spring 的解决方案,而是和 Spring 框架紧密结合用于提升 Spring 开发者体验的工具。Spring Boot 以约定大于配置的核心思想,默认帮我们进行了很多设置,多数 Spring Boot 应用只需要很少的 Spring 配置。同时它集成了大量常用的第三方库配置(例如 Redis、MongoDB、Jpa、RabbitMQ、Quartz 等等),Spring Boot 应用中这些第三方库几乎可以零配置的开箱即用。
简单来说就是SpringBoot其实不是什么新的框架,它默认配置了很多框架的使用方式,就像maven整合了所有的jar包,spring boot整合了所有的框架
Spring是如何简化Java开发的 为了降低Java开发的复杂性,Spring采用了以下4种关键策略:
1、基于POJO的轻量级和最小侵入性编程,所有东西都是bean POJO 就是 “普通的 Java 类” 像你自己画的一张白纸(POJO),没有被任何框架(比如 Spring、EJB)在上面印固定的格子、写固定 的要求;
“非 POJO” 就像学校发的答题卡,必须按固定格子填、必须用对应继承框架的类、实现框架的接口
Spring 里的 “bean”,本质就是把你写的 POJO 交给 Spring 容器管理而已,并没有改变这个类的本质。
1
2
3
4
5
6
7
8
9
10
11
12
13
14
// 非POJO必须继承EJB的特定父类,否则根本用不了这个框架 // 这就是“高侵入性”:你的类被框架绑架了 public class UserService extends EJBObject { // 必须实现EJB要求的方法,哪怕你根本用不上 @Override public void ejbCreate() throws CreateException { // 框架要求必须写,哪怕是空的 } // 你的核心业务方法 public void addUser() { System.out.println("添加用户"); } }
这个类的问题:
脱离 EJB 框架就废了 删掉 EJB 依赖,这个类会直接报错(因为继承了 EJBObject);
你必须按框架的要求写代码(比如实现 ejbCreate 方法),哪怕这些代码和你的业务无关。
低侵入性
Spring 只是 “接管” 了你的 POJO 的创建、管理,没有要求你的类继承 / 实现任何 Spring 的类 / 接口;
你的业务代码(比如 addUser 方法)只关注自己的逻辑,没有任何框架强加的多余代码;
想脱离 Spring只需要去掉注解,手动 new 对象就行,代码不用改
把这个 POJO 变成 Spring 的 bean(只加 “标记”,不改类本身)
1
2
3
4
5
6
7
// 只加了@Service注解(标记),类本身还是原来的POJO,没有任何改动 @Service public class UserService { public void addUser() { System.out.println("添加用户"); } }
1
2
3
4
5
6
7
8
9
// 依然是POJO,只是加了一个@Service注解(相当于“告诉Spring:这个类你帮我管一下”) // 注解只是“标记”,不是“绑定”,就算删掉注解,类本身完全能用 @Service public class UserService { // 你的核心业务方法(没有任何框架要求的多余代码) public void addUser() { System.out.println("添加用户"); } }
差别就是
就算把 Spring 删掉,把 @Service 注解去掉,这个 UserService 类依然能正常用
2、通过IOC,依赖注入(DI)和面向接口实现松耦合; 耦合就是代码之间的 “绑定程度”:
高耦合 :A 类直接依赖 B 类的具体实现,改 B 就要改 A松耦合 :A 类只依赖 B 类的 “规则(接口)”,不管 B 怎么改,只要遵守规则,A 就不用改
Spring 的 IOC+DI + 面向接口,就是把代码从 “专用接口” 改成 “通用接口”,实现松耦合
3、基于切面(AOP)和惯例进行声明式编程; 声明式编程的核心是 “用注解 / 配置声明要做什么,AOP 自动完成拦截”,这也是安全漏洞的高发区
切点是 “AOP 要拦截哪些方法” 的规则
通知是 “AOP 拦截方法后要做什么”,尤其是Around通知(可完全控制目标方法的执行)
切面是 “切点 + 通知” 的组合
4、通过切面和模版减少样式代码,RedisTemplate,xxxTemplate; Template 类的本质:“封装了底层操作的工具类”
HelloWord
idea可以直接很方便的去创建项目
完成了项目创建就会自动生成以下文件
1、程序的主启动类
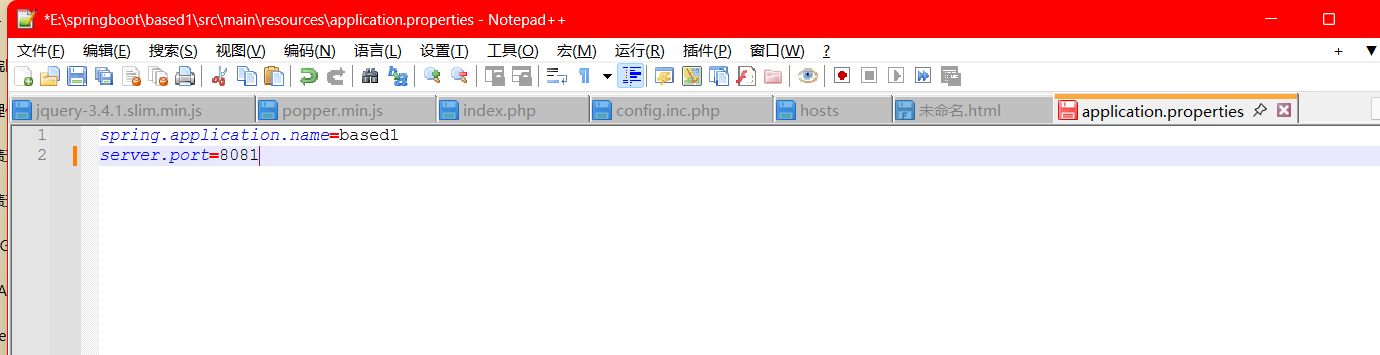
2、一个 application.properties 配置文件
3、一个 测试类
4、一个 pom.xml
pom.xml
1
2
3
4
5
6
7
8
9
10
11
12
13
14
15
16
17
18
19
20
21
22
23
24
25
26
27
28
29
30
31
32
33
34
35
36
37
38
39
40
41
42
43
44
45
46
47
48
49
50
51
52
53
54
55
<?xml version="1.0" encoding="UTF-8" ?> <project xmlns ="http://maven.apache.org/POM/4.0.0" xmlns:xsi ="http://www.w3.org/2001/XMLSchema-instance" xsi:schemaLocation ="http://maven.apache.org/POM/4.0.0 https://maven.apache.org/xsd/maven-4.0.0.xsd" > <modelVersion > 4.0.0</modelVersion > <parent > <groupId > org.springframework.boot</groupId > <artifactId > spring-boot-starter-parent</artifactId > <version > 4.0.2</version > <relativePath /> </parent > <groupId > com.example</groupId > <artifactId > based1</artifactId > <version > 0.0.1-SNAPSHOT</version > <name > based1</name > <description > based1</description > <url /> <licenses > <license /> </licenses > <developers > <developer /> </developers > <scm > <connection /> <developerConnection /> <tag /> <url /> </scm > <properties > <java.version > 17</java.version > </properties > <dependencies > <dependency > <groupId > org.springframework.boot</groupId > <artifactId > spring-boot-starter</artifactId > </dependency > <dependency > <groupId > org.springframework.boot</groupId > <artifactId > spring-boot-starter-test</artifactId > <scope > test</scope > </dependency > </dependencies > <build > <plugins > <plugin > <groupId > org.springframework.boot</groupId > <artifactId > spring-boot-maven-plugin</artifactId > </plugin > </plugins > </build > </project >
这个文件可以改端口
运行原理 Spring Boot 之所以「开箱即用」,核心是做了三件事:
版本统一管理 :通过父依赖固化所有组件的版本,避免版本冲突;场景化启动器 :把特定功能的所有依赖打包成「启动器」,一键导入;自动配置 :通过注解和配置文件,自动完成 Spring 繁琐的 XML/Java 配置,无需手动写。
pom.xml 父依赖 <parent> 节点是 Spring Boot 版本管理的核心
第一层
1
2
3
4
5
6
<parent> <groupId>org.springframework.boot</groupId> <artifactId>spring-boot-starter-parent</artifactId> <version>2.6.2</version> <relativePath/> </parent>
管理资源过滤 (比如 .properties/.yml 文件的编码、加载规则);
管理构建插件 (比如 spring-boot-maven-plugin 的默认配置);
第二层(Spring Boot 的版本控制中心)
1
2
3
4
5
<parent> <groupId>org.springframework.boot</groupId> <artifactId>spring-boot-dependencies</artifactId> <version>2.6.2</version> </parent>
它在 <dependencyManagement> 里定义了几乎所有 Spring 生态组件的版本(比如 Spring Core、Tomcat、MyBatis 等);
你项目中引入 spring-boot-starter-web 时不用写版本,就是因为这里已经定好了;
只有引入「不在这个清单里」的依赖(比如一些小众组件),才需要手动写版本号。
启动器spring-boot-starter 1 2 3 4 <dependency> <groupId>org.springframework.boot</groupId> <artifactId>spring-boot-starter</artifactId> </dependency>
启动器:说白了就是SpringBoot的启动场景
比如spring-boot-starter-web,会帮我们自动导入web环境所有的依赖
springboot会将所有功能场景,都变成一个个的启动器
我们要是用什么功能,就需要找到一个个启动器就可以了
有官方文件可以看Spring Boot Reference Documentation
1 2 3 4 5 6 7 8 9 10 11 12 13 14 15 package com.example.based1; import org.springframework.boot.SpringApplication; import org.springframework.boot.autoconfigure.SpringBootApplication; //标记这是Spring Boot应用的主类(复合注解,核心作用之前讲过) @SpringBootApplication // 标准main方法:Java程序的入口,JVM启动时执行 public class Based1Application { public static void main(String[] args) { SpringApplication.run(Based1Application.class, args); } }
META-INF/spring.factories:自动配置的核心文件
SpringBoot所有的自动配置,都在启动类中被扫描并加载:所有的自动配置类都在这里面,但是不一定生效,要判断条件是否成立,只要导入了对应的starter们就有对应的启动器了,有了启动器,我们的自动装配就会生效,然后就配置成功了
SpringBoot在启动的时候,从类路径下/META-INF/spring.factories获取指定的值
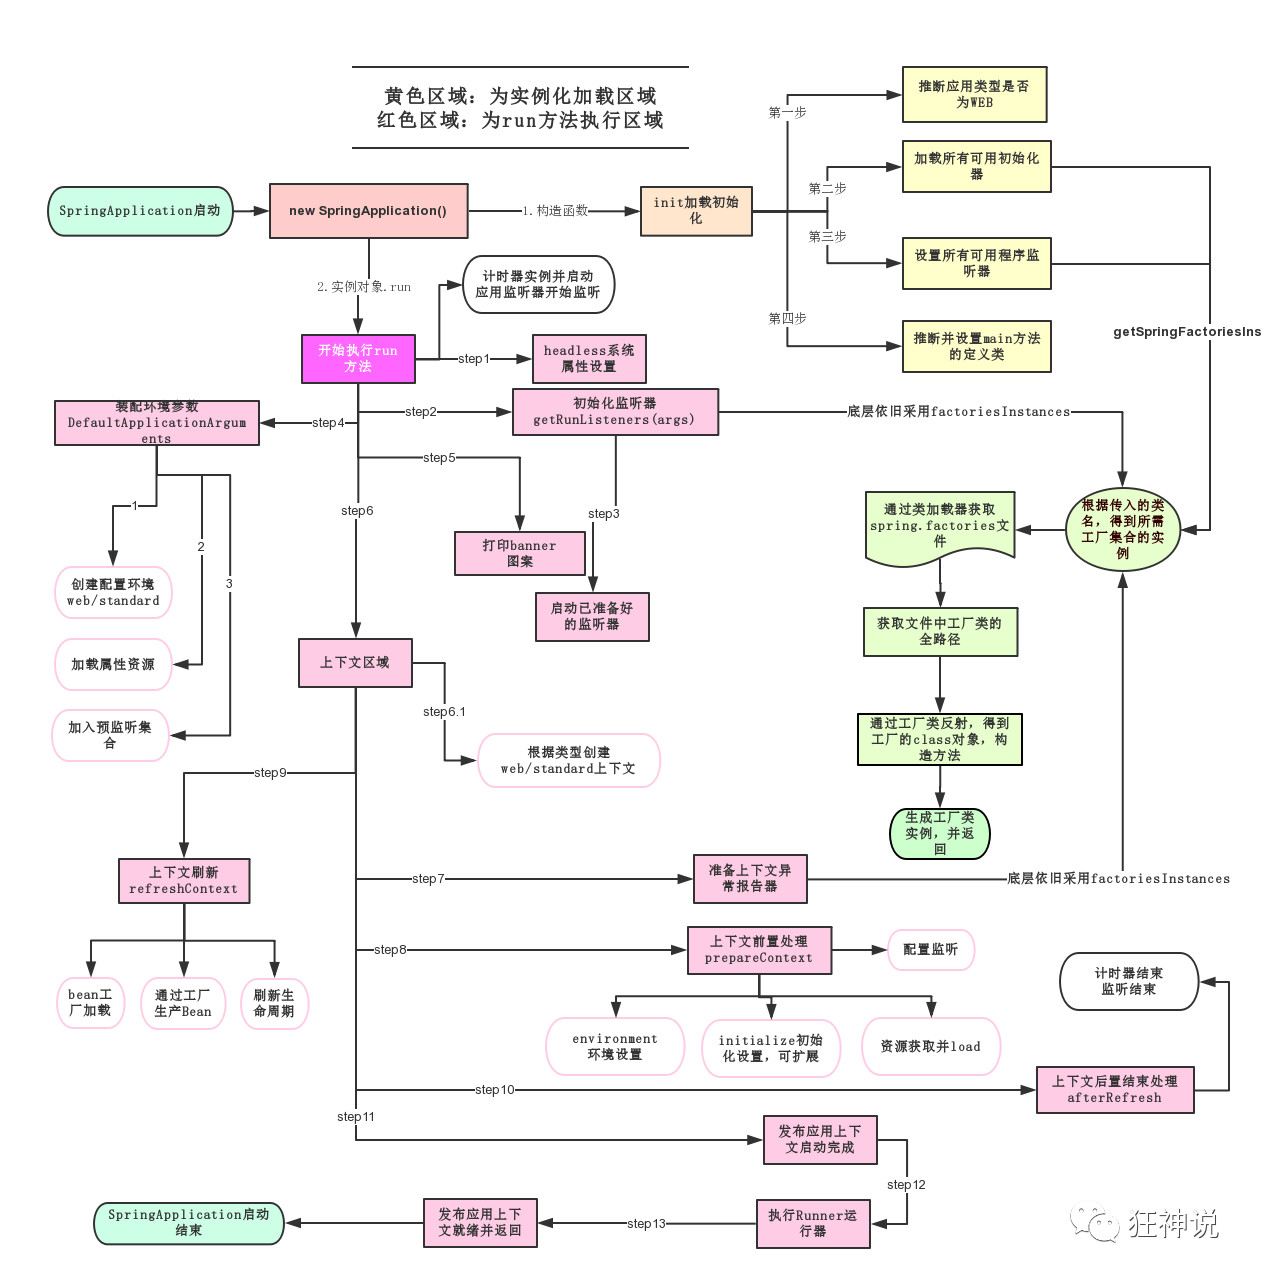
SpringApplication.run() SpringApplication.run() 不是普通的 main 方法执行,而是把普通 Java 程序,通过「初始化准备 + 全流程启动」,变成一个能持续运行的 Spring Boot 应用(含 Web 服务) 。
主要分两部分,一部分是SpringApplication的实例化,二是run方法的执行
SpringApplication
1、推断应用的类型是普通的项目还是Web项目
yaml 这种语言以数据作为中心,而不是以标记语言为重点
传统xml配置:
1 2 3 <server> <port>8081<port> </server>
yaml配置:
yaml文件更强大的地方在于,他可以给我们的实体类直接注入匹配值
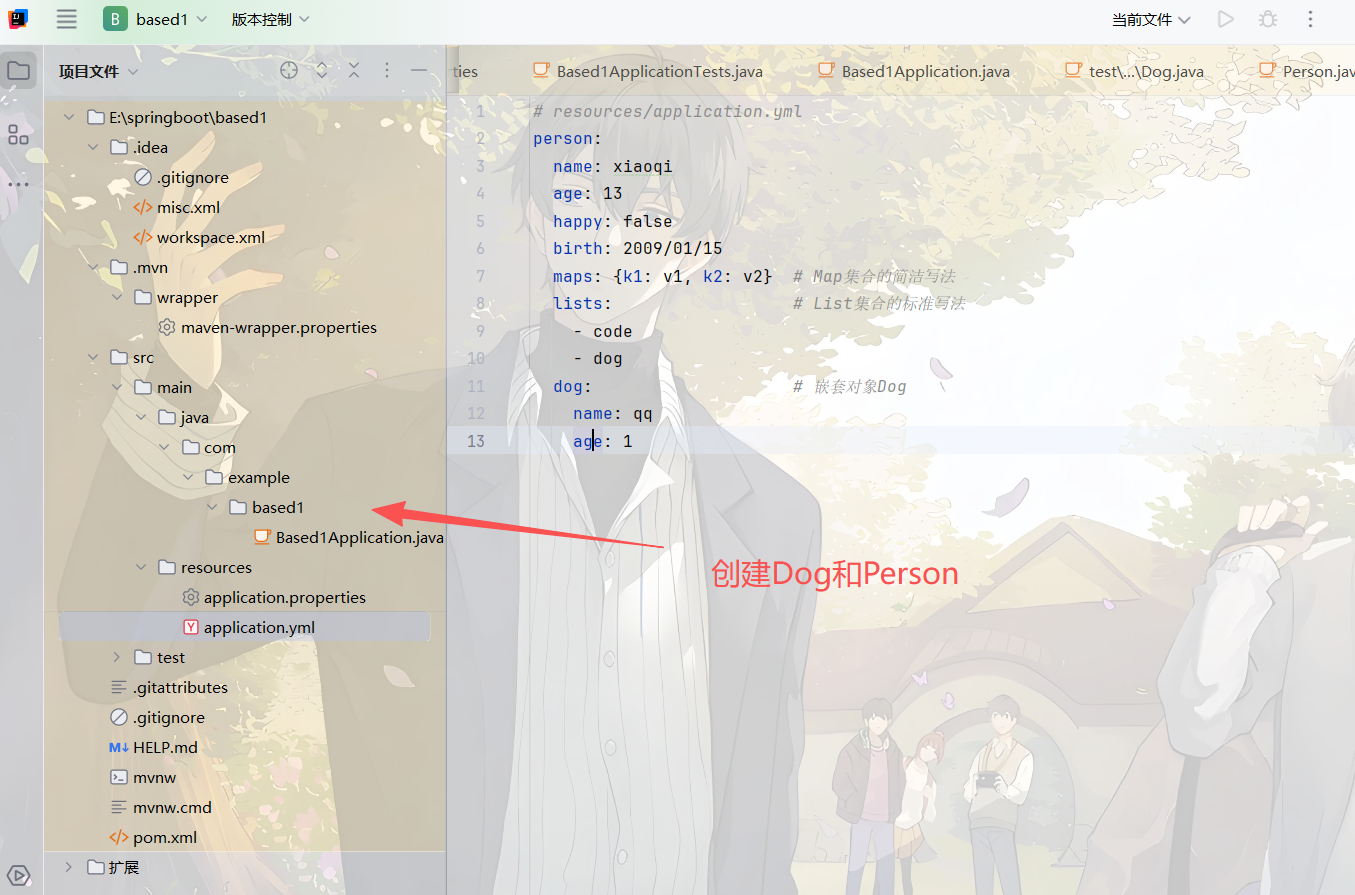
application.yml
1 2 3 4 5 6 7 8 9 10 11 12 13 # resources/application.yml person: name: xiaoqi age: 13 happy: false birth: 2009/01/15 maps: {k1: v1, k2: v2} # Map集合的简洁写法 lists: # List集合的标准写法 - code - dog dog: # 嵌套对象Dog name: qq age: 1
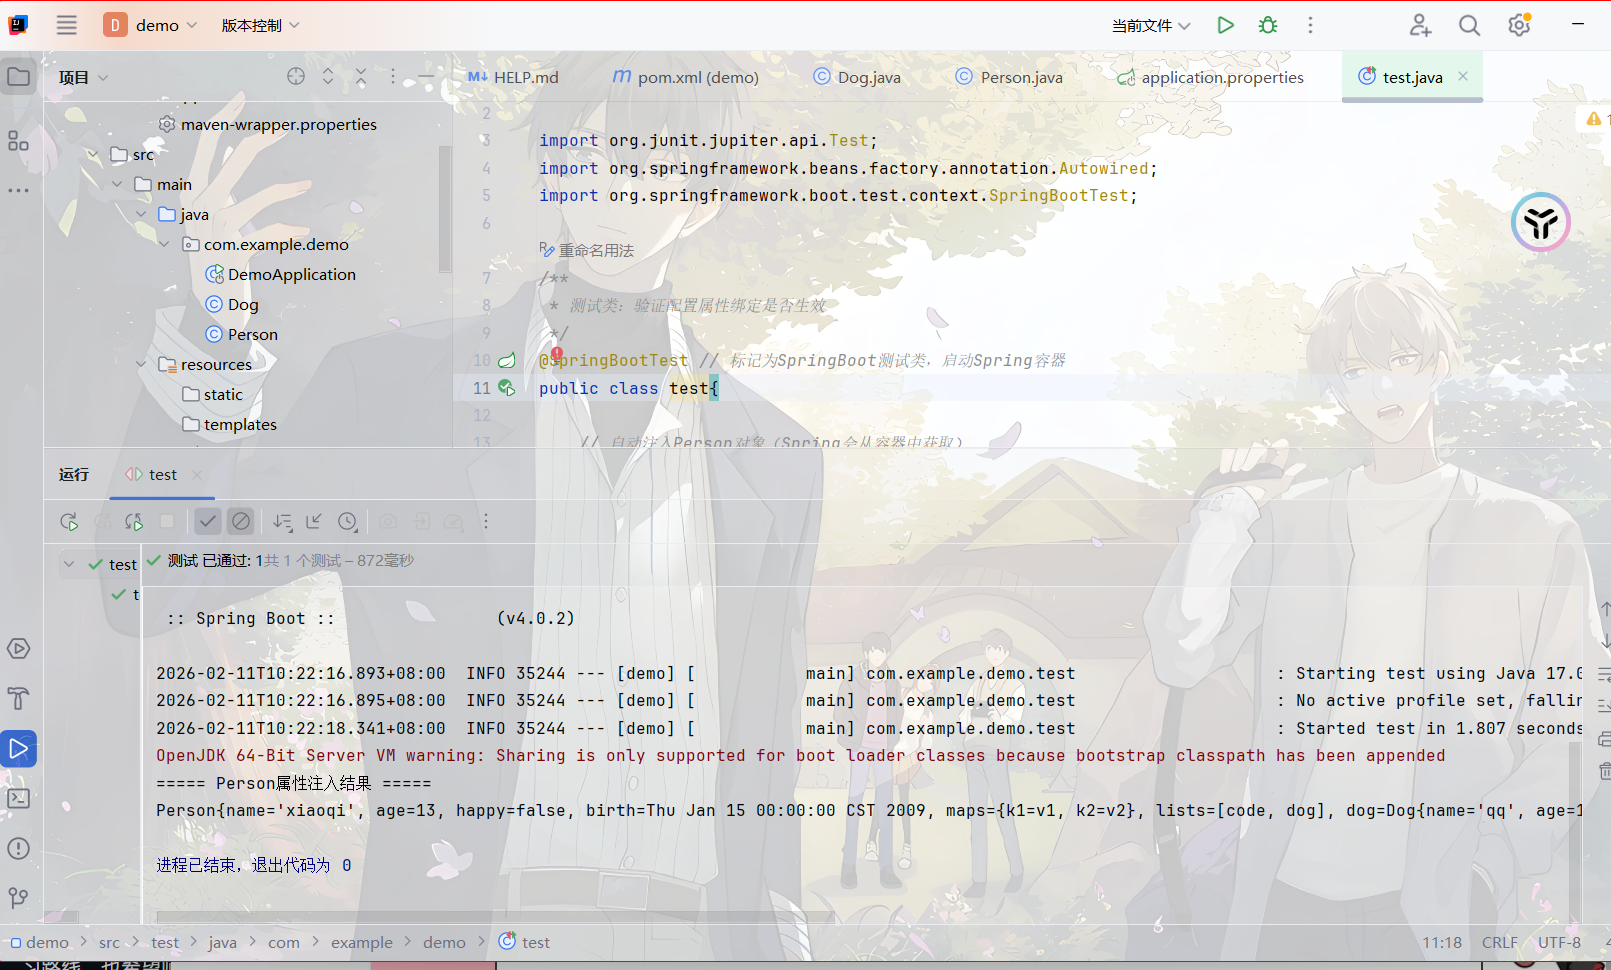
测试文件
JSR303检验 1 2 3 4 5 6 7 8 9 10 11 12 13 14 15 16 17 18 19 20 21 22 23 24 25 26 27 28 29 30 31 32 33 34 35 空检查 @Null 验证对象是否为null @NotNull 验证对象是否不为null, 无法查检长度为0的字符串 @NotBlank 检查约束字符串是不是Null还有被Trim的长度是否大于0,只对字符串,且会去掉前后空格. @NotEmpty 检查约束元素是否为NULL或者是EMPTY. Booelan检查 @AssertTrue 验证 Boolean 对象是否为 true @AssertFalse 验证 Boolean 对象是否为 false 长度检查 @Size(min=, max=) 验证对象(Array,Collection,Map,String)长度是否在给定的范围之内 @Length(min=, max=) Validates that the annotated string is between min and max included. 日期检查 @Past 验证 Date 和 Calendar 对象是否在当前时间之前,验证成立的话被注释的元素一定是一个过去的日期 @Future 验证 Date 和 Calendar 对象是否在当前时间之后 ,验证成立的话被注释的元素一定是一个将来的日期 @Pattern 验证 String 对象是否符合正则表达式的规则,被注释的元素符合制定的正则表达式,regexp:正则表达式 flags: 指定 Pattern.Flag 的数组,表示正则表达式的相关选项。 数值检查 建议使用在Stirng,Integer类型,不建议使用在int类型上,因为表单值为“”时无法转换为int,但可以转换为Stirng为”“,Integer为null @Min 验证 Number 和 String 对象是否大等于指定的值 @Max 验证 Number 和 String 对象是否小等于指定的值 @DecimalMax 被标注的值必须不大于约束中指定的最大值. 这个约束的参数是一个通过BigDecimal定义的最大值的字符串表示.小数存在精度 @DecimalMin 被标注的值必须不小于约束中指定的最小值. 这个约束的参数是一个通过BigDecimal定义的最小值的字符串表示.小数存在精度 @Digits 验证 Number 和 String 的构成是否合法 @Digits(integer=,fraction=) 验证字符串是否是符合指定格式的数字,interger指定整数精度,fraction指定小数精度。 @Range(min=, max=) 被指定的元素必须在合适的范围内 @Range(min=10000,max=50000,message=”range.bean.wage”) @Valid 递归的对关联对象进行校验, 如果关联对象是个集合或者数组,那么对其中的元素进行递归校验,如果是一个map,则对其中的值部分进行校验.(是否进行递归验证) @CreditCardNumber信用卡验证 @Email 验证是否是邮件地址,如果为null,不进行验证,算通过验证。 @ScriptAssert(lang= ,script=, alias=) @URL(protocol=,host=, port=,regexp=, flags=)]()]()
springboot 启动会扫描以下位置的application.properties或者application.yml文件作为Spring boot的默认配置文件
1 2 3 4 优先级1:项目路径下的config文件夹配置文件优先级 2:项目路径下配置文件优先级 3:资源路径下的config文件夹配置文件优先级 4:资源路径下配置文件
SpringBootWeb开发 1 2 3 4 5 6 7 8 9 10 11 12 13 14 15 16 @Override public void addResourceHandlers(ResourceHandlerRegistry registry) { if (!this.resourceProperties.isAddMappings()) { logger.debug("Default resource handling disabled"); return; } addResourceHandler(registry, "/webjars/**", "classpath:/META-INF/resources/webjars/"); addResourceHandler(registry, this.mvcProperties.getStaticPathPattern(), (registration) -> { registration.addResourceLocations(this.resourceProperties.getStaticLocations()); if (this.servletContext != null) { ServletContextResource resource = new ServletContextResource(this.servletContext, SERVLET_LOCATION); registration.addResourceLocations(resource); } }); }
WebJars是将web前端资源(js,css等)打成jar包文件 ,然后借助Maven工具,以jar包形式对web前端资源进行统一依赖管理,保证这些Web资源版本唯一性。WebJars的jar包部署在Maven中央仓库上。
拿到静态资源的第一种方式
1 http://localhost:8080/webjars/github-com-jquery-jquery/3.4.1/jquery.js
使用/**/static或者/resources或者/public来访问静态资源
优先级:resources>static(默认)>puiblic
很少使用webjar
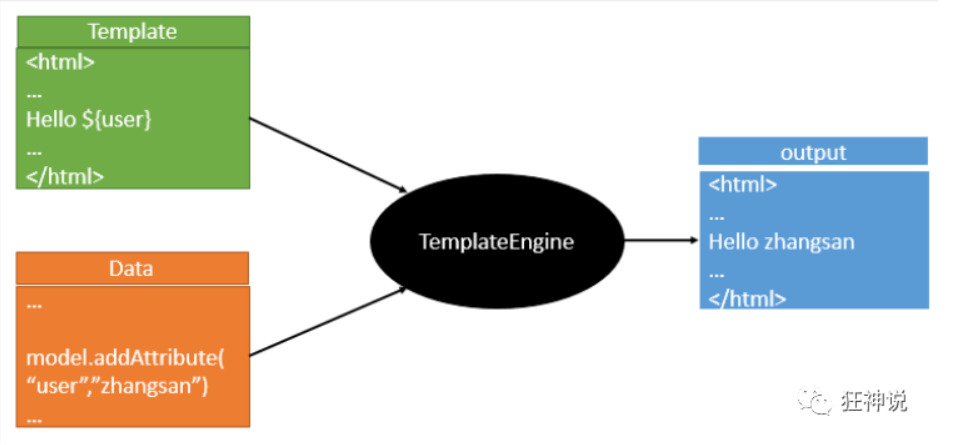
Thymeleaf模板引擎 模板引擎 前端交给我们的页面,是html页面。如果是我们以前开发,我们需要把他们转成jsp页面,jsp好处就是当我们查出一些数据转发到JSP页面以后,我们可以用jsp轻松实现数据的显示,及交互等。
jsp支持非常强大的功能,包括能写Java代码,但是呢,我们现在的这种情况,SpringBoot这个项目首先是以jar的方式,不是war,像第二,我们用的还是嵌入式的Tomcat,所以呢,他现在默认是不支持jsp的。
那不支持jsp,如果我们直接用纯静态页面的方式,那给我们开发会带来非常大的麻烦,那怎么办呢?
SpringBoot推荐你可以来使用模板引擎:
模板引擎,我们其实大家听到很多,其实jsp就是一个模板引擎,还有用的比较多的freemarker,包括SpringBoot给我们推荐的Thymeleaf,模板引擎有非常多,但再多的模板引擎,他们的思想都是一样的
引入Thymeleaf 1 2 3 4 5 6 7 8 Thymeleaf 官网:https://www.thymeleaf.org/ Thymeleaf 在Github 的主页:https://github.com/thymeleaf/thymeleaf Spring官方文档:找到我们对应的版本 https://docs.spring.io/spring-boot/docs/2.2.5.RELEASE/reference/htmlsingle/#using-boot-starter
https://www.thymeleaf.org/
语法直接看官方 文档就可以了
Thymeleaf的自动配置类:ThymeleafProperties 1 2 3 4 5 6 7 8 9 10 11 12 13 14 15 @ConfigurationProperties( prefix = "spring.thymeleaf" ) public class ThymeleafProperties { private static final Charset DEFAULT_ENCODING; public static final String DEFAULT_PREFIX = "classpath:/templates/"; public static final String DEFAULT_SUFFIX = ".html"; private boolean checkTemplate = true; private boolean checkTemplateLocation = true; private String prefix = "classpath:/templates/"; private String suffix = ".html"; private String mode = "HTML"; private Charset encoding; }
我们只需要把我们的html页面放在类路径下的templates下,thymeleaf就可以帮我们自动渲染了。
使用thymeleaf什么都不需要配置,只需要将他放在指定的文件夹下即可!
修改SpringBoot的默认配置 SpringBoot在自动配置很多组件的时候,先看容器中有没有用户自己配置的(如果用户自己配置@bean),如果有就用用户配置的,如果没有就用自动配置的;
所有的WebMvcConfiguration都会被作用,不止Spring自己的配置类,我们自己的配置类当然也会被调用
整合JDBC 对于数据访问层,无论是 SQL(关系型数据库) 还是 NOSQL(非关系型数据库),Spring Boot 底层都是采用 Spring Data 的方式进行统一处理。
Spring Boot 底层都是采用 Spring Data 的方式进行统一处理各种数据库,Spring Data 也是 Spring 中与 Spring Boot、Spring Cloud 等齐名的知名项目。
Sping Data 官网:https://spring.io/projects/spring-data
SpringBoot 整合 JDBC 核心是配置application.yml+ 引入spring-boot-starter-jdbc和 MySQL 驱动
数据源测试通过注入DataSource获取连接,验证配置是否正确;
JdbcTemplate 是 Spring 封装的 JDBC 工具,自动配置后可直接注入,通过update()做增删改,query()系列做查询;
数据源自动配置核心类是DataSourceAutoConfiguration,默认使用 HikariDataSource,可通过spring.datasource.type自定义。
SpringBoot 集成 Druid 数据源 集成 Druid 的核心价值:
替换默认数据源,使用阿里 Druid(更优的性能 + 监控能力);
配置 Druid 专属参数(如连接池大小、超时时间);
开启 Druid 的 Web 监控功能(查看 SQL 执行、连接池状态、防 SQL 注入等)。
引入 Druid 和 Log4j 依赖(pom.xml) 1 2 3 4 5 6 7 8 9 10 11 12 13 14 15 16 17 18 19 20 21 22 23 24 25 26 27 28 <!-- Druid数据源依赖(阿里官方) --> <dependency> <groupId>com.alibaba</groupId> <artifactId>druid-spring-boot-starter</artifactId> <version>1.2.20</version> <!-- 稳定版,兼容SpringBoot 2.x/3.x --> </dependency> <!-- Log4j依赖(解决Druid监控的日志依赖) --> <dependency> <groupId>log4j</groupId> <artifactId>log4j</artifactId> <version>1.2.17</version> </dependency> <!-- 基础依赖(必须) --> <dependency> <groupId>org.springframework.boot</groupId> <artifactId>spring-boot-starter-web</artifactId> </dependency> <dependency> <groupId>org.springframework.boot</groupId> <artifactId>spring-boot-starter-jdbc</artifactId> </dependency> <dependency> <groupId>com.mysql</groupId> <artifactId>mysql-connector-j</artifactId> <scope>runtime</scope> </dependency>
编写 Druid 专属配置(application.yml)
1 2 3 4 5 6 7 8 9 10 11 12 13 14 15 16 17 18 19 20 21 22 23 24 25 26 27 28 29 30 spring: datasource: # 基础数据库配置 username: root password: 123456 url: jdbc:mysql://localhost:3306/mybatis?useSSL=false&useUnicode=true&characterEncoding=utf8mb4&serverTimezone=Asia/Shanghai driver-class-name: com.mysql.cj.jdbc.Driver # 1. 指定数据源类型为Druid(替换默认Hikari) type: com.alibaba.druid.pool.DruidDataSource # 2. Druid专属配置(SpringBoot默认不注入,需自定义配置类绑定) druid: # 连接池基础配置 initial-size: 5 # 初始化连接数 min-idle: 5 # 最小空闲连接数 max-active: 20 # 最大活跃连接数 max-wait: 60000 # 获取连接的最大等待时间(毫秒) time-between-eviction-runs-millis: 60000 # 检测空闲连接的间隔时间 min-evictable-idle-time-millis: 300000 # 空闲连接的最小存活时间 validation-query: SELECT 1 FROM DUAL # 验证连接是否有效 test-while-idle: true # 空闲时检测连接有效性 test-on-borrow: false # 获取连接时不检测(提升性能) test-on-return: false # 归还连接时不检测 pool-prepared-statements: true # 开启预编译语句池 # 3. 监控配置 filters: stat,wall,log4j # 开启监控(stat)、防SQL注入(wall)、日志(log4j) max-pool-prepared-statement-per-connection-size: 20 # 预编译语句池大小 use-global-data-source-stat: true # 全局统计开关 connection-properties: druid.stat.mergeSql=true;druid.stat.slowSqlMillis=500 # 合并SQL统计、慢SQL阈值(500ms)
自定义 Druid 配置类(DruidConfig.java
1 2 3 4 5 6 7 8 9 10 11 12 13 14 15 16 17 18 19 20 21 22 23 24 25 26 27 28 29 30 31 32 33 34 35 36 37 38 39 40 41 42 43 44 45 46 47 48 49 50 51 52 53 54 55 56 57 58 59 60 61 62 63 64 65 package com.example.springboot04date.config; import com.alibaba.druid.pool.DruidDataSource; import com.alibaba.druid.support.http.StatViewServlet; import com.alibaba.druid.support.http.WebStatFilter; import org.springframework.boot.context.properties.ConfigurationProperties; import org.springframework.boot.web.servlet.FilterRegistrationBean; import org.springframework.boot.web.servlet.ServletRegistrationBean; import org.springframework.context.annotation.Bean; import org.springframework.context.annotation.Configuration; import javax.sql.DataSource; import java.util.HashMap; import java.util.Map; // 标记为配置类,Spring启动时加载 @Configuration public class DruidConfig { // ========== 1. 配置Druid数据源(绑定yml中的druid配置) ========== @Bean // 绑定前缀:spring.datasource(包含基础配置+druid专属配置) @ConfigurationProperties(prefix = "spring.datasource") public DataSource druidDataSource() { // 返回Druid数据源,替代SpringBoot默认的Hikari return new DruidDataSource(); } // ========== 2. 配置Druid监控Servlet(后台管理页面) ========== // SpringBoot无web.xml,通过ServletRegistrationBean注册Servlet @Bean public ServletRegistrationBean<StatViewServlet> statViewServlet() { // 注册StatViewServlet,映射路径:/druid/*(固定,访问该路径进入监控页面) ServletRegistrationBean<StatViewServlet> bean = new ServletRegistrationBean<>( new StatViewServlet(), "/druid/*" ); // 配置监控页面的登录账号密码(key是固定的,不能改) Map<String, String> initParams = new HashMap<>(); initParams.put("loginUsername", "admin"); // 登录用户名 initParams.put("loginPassword", "123456");// 登录密码 initParams.put("allow", ""); // 允许所有IP访问(空字符串=所有) // initParams.put("deny", "192.168.1.100"); // 禁止指定IP访问(可选) bean.setInitParameters(initParams); // 设置初始化参数 return bean; } // ========== 3. 配置Druid监控Filter(过滤请求,统计SQL执行) ========== @Bean public FilterRegistrationBean<WebStatFilter> webStatFilter() { FilterRegistrationBean<WebStatFilter> bean = new FilterRegistrationBean<>(); bean.setFilter(new WebStatFilter()); // 绑定Druid的WebStatFilter // 配置过滤规则:排除静态资源和监控页面 Map<String, String> initParams = new HashMap<>(); // 排除的请求:js/css文件、druid监控页面 initParams.put("exclusions", "*.js,*.css,/druid/*"); bean.setInitParameters(initParams); // 配置需要过滤的请求(所有请求) bean.addUrlPatterns("/*"); return bean; } }
@ConfigurationProperties(prefix = "spring.datasource"):将 yml 中的数据源配置绑定到 DruidDataSource 对象;
StatViewServlet:提供 Druid 的 Web 监控页面(登录后可查看连接池、SQL 执行等);
WebStatFilter:过滤请求,统计所有 SQL 执行、请求耗时等数据。
编写测试类,检查数据源类型
1 2 3 4 5 6 7 8 9 10 11 12 13 14 15 16 17 18 19 20 21 package com.example.springboot04date; import org.junit.jupiter.api.Test; import org.springframework.beans.factory.annotation.Autowired; import org.springframework.boot.test.context.SpringBootTest; import javax.sql.DataSource; @SpringBootTest class DruidTest { @Autowired private DataSource dataSource; @Test void testDruidDataSource() { // 打印数据源类型,验证是否为Druid System.out.println("当前数据源类型:" + dataSource.getClass()); // 正确输出:class com.alibaba.druid.pool.DruidDataSource } }
SpringBoot 整合 MyBatis 通过 MyBatis 实现数据库的 CRUD 操作(替代之前的 JdbcTemplate)
核心是:
引入 MyBatis 的 SpringBoot Starter,简化配置;
通过@Mapper注解标识 Mapper 接口,让 MyBatis 扫描并生成代理实现类;
配置 MyBatis 的别名、Mapper.xml 路径,让 Spring 能识别映射文件;
注入 Mapper 接口,调用方法实现数据库 CRUD
官方文档:http://mybatis.org/spring-boot-starter/mybatis-spring-boot-autoconfigure/
Maven仓库地址:Maven Repository: org.mybatis.spring.boot » mybatis-spring-boot-starter » 2.1.3
SpringSecurity 整合 SpringBoot SpringSecurity 的核心是认证(Authentication) 和授权(Authorization) :
认证 :验证用户身份(如用户名密码是否正确);授权 :验证用户是否有访问某个资源的权限(如 vip1 只能访问 level1 页面);核心类:WebSecurityConfigurerAdapter(自定义安全策略)、AuthenticationManagerBuilder(自定义认证规则);
核心注解:@EnableWebSecurity(开启 Web 安全模式)。
确保前端页面路径和 Controller 映射一致
比如
1 2 3 4 5 6 7 8 9 10 11 12 13 14 15 16 src/main/resources/templates/ ├── index.html # 首页 ├── views/ │ ├── login.html # 自定义登录页 │ ├── level1/ │ │ ├── 1.html # vip1权限页面 │ │ ├── 2.html │ │ └── 3.html │ ├── level2/ │ │ ├── 1.html # vip2权限页面 │ │ ├── 2.html │ │ └── 3.html │ └── level3/ │ ├── 1.html # vip3权限页面 │ ├── 2.html │ └── 3.html
Controller 层(RouterController.java)
1 2 3 4 5 6 7 8 9 10 11 12 13 14 15 16 17 18 19 20 21 22 23 24 25 26 27 28 29 30 31 32 33 34 35 36 37 38 package com.xiaoqi.controller; import org.springframework.stereotype.Controller; import org.springframework.web.bind.annotation.PathVariable; import org.springframework.web.bind.annotation.RequestMapping; @Controller public class RouterController { // 首页(所有人可访问) @RequestMapping({"/","/index"}) public String index(){ return "index"; } // 跳转到自定义登录页 @RequestMapping("/toLogin") public String toLogin(){ return "views/login"; } // vip1权限页面 @RequestMapping("/level1/{id}") public String level1(@PathVariable("id") int id){ return "views/level1/" + id; } // vip2权限页面 @RequestMapping("/level2/{id}") public String level2(@PathVariable("id") int id){ return "views/level2/" + id; } // vip3权限页面(原代码拼写错误:levle3 → level3) @RequestMapping("/level3/{id}") public String level3(@PathVariable("id") int id){ return "views/level3/" + id; } }
核心配置类(SecurityConfig.java)
1 2 3 4 5 6 7 8 9 10 11 12 13 14 15 16 17 18 19 20 21 22 23 24 25 26 27 28 29 30 31 32 33 34 35 36 37 38 39 40 41 42 43 44 45 46 47 48 49 50 51 52 53 54 55 56 57 58 59 60 61 62 63 64 65 66 67 68 69 package com.xiaoqi.config; import org.springframework.security.config.annotation.authentication.builders.AuthenticationManagerBuilder; import org.springframework.security.config.annotation.web.builders.HttpSecurity; import org.springframework.security.config.annotation.web.configuration.EnableWebSecurity; import org.springframework.security.config.annotation.web.configuration.WebSecurityConfigurerAdapter; import org.springframework.security.crypto.bcrypt.BCryptPasswordEncoder; // 开启WebSecurity模式,加载自定义安全配置 @EnableWebSecurity public class SecurityConfig extends WebSecurityConfigurerAdapter { // ========== 1. 授权规则配置(哪些URL需要哪些权限) ========== @Override protected void configure(HttpSecurity http) throws Exception { // 授权规则:链式编程 http.authorizeHttpRequests() .antMatchers("/", "/index").permitAll() // 首页所有人可访问 .antMatchers("/level1/**").hasRole("vip1") // level1/**需要vip1角色 .antMatchers("/level2/**").hasRole("vip2") // level2/**需要vip2角色 .antMatchers("/level3/**").hasRole("vip3") // level3/**需要vip3角色 .anyRequest().authenticated(); // 其他所有请求都需要认证(登录) // ========== 2. 自定义登录配置 ========== http.formLogin() .loginPage("/toLogin") // 自定义登录页路径(对应Controller的/toLogin) .loginProcessingUrl("/login") // 登录表单提交的URL(SpringSecurity自动处理,无需写Controller) .usernameParameter("username") // 登录表单的用户名参数名(需和login.html的input name一致) .passwordParameter("password") // 登录表单的密码参数名 .defaultSuccessUrl("/index"); // 登录成功后跳转的页面 // ========== 3. 注销配置 ========== http.logout() .logoutUrl("/logout") // 注销请求URL(默认就是/logout) .logoutSuccessUrl("/index") // 注销成功后跳转首页 .invalidateHttpSession(true); // 注销时销毁session // ========== 4. 记住我功能 ========== http.rememberMe() .rememberMeParameter("remember") // 登录表单的“记住我”参数名(需和login.html的input name一致) .tokenValiditySeconds(60*60*24*7); // 记住我有效期:7天(默认2周) // ========== 5. 关闭CSRF(开发环境简化,生产环境需开启) ========== http.csrf().disable(); } // ========== 2. 认证规则配置(用户、密码、角色) ========== @Override protected void configure(AuthenticationManagerBuilder auth) throws Exception { // 基于内存的认证(生产环境需替换为数据库认证) auth.inMemoryAuthentication() .passwordEncoder(new BCryptPasswordEncoder()) // 密码加密(SpringSecurity5必须配置) // 用户1:xiaoqi,密码123456,角色vip2、vip3 .withUser("xiaoqi") .password(new BCryptPasswordEncoder().encode("123456")) .roles("vip2", "vip3") .and() // 用户2:root,密码123456,角色vip1、vip2、vip3 .withUser("root") .password(new BCryptPasswordEncoder().encode("123456")) .roles("vip1", "vip2", "vip3") .and() // 用户3:guest,密码123456,角色vip1 .withUser("guest") .password(new BCryptPasswordEncoder().encode("123456")) .roles("vip1"); } }
之后就是前端页面配置
SpringBoot集成Swagger SpringBoot集成Swagger => springfox ,两个jar包
Springfox-swagger2 swagger-springmvc


![“[NewStarCTF 2025]WEEK3--web方向wp”](/img/newstar5.jpg)